Hunza-Pakistan

Learn to earn online!

Here you will find your way to earn through internet.

Hunza-Tech

Hunza-Tech shares the most updated information about how to earn online with its users. This website specifically focuses on Lates SEO / SMM Blogging and content monetization techniques.

Keep on visiting Hunza-Tech.

We constantly update you about the best available and latest Online Earning and Learning resources.

Make your blog / website more income generative!

Here we will be sharing our practical experience of effective SEO Friendly blogging techniques to drive more a traffic.

Hunza-Tech

Well planned Blog / Website with proper marketting returns well. We let you know about the effective blogging and SEO to get more from your blog.

Wednesday, March 19, 2014

How to download YouTube, Facebook and Daily Motion videos without download accelerator?

I have seen many people asking in various forums that “how to download youtube videos without installing download accelerator?” or how to download facebook videos without installing download accelerator?” and how to download daily motion videos without installing download accelerator?”.
You really don’t need a specific download accelerator for downloading videos from youtube, facebook or daily motion. Although there are various download accelerators available to download videos from youtube. But the problem is that it may download a youtude video but not one from daily motion or facebook. It is really frustrating!
Here I am going to tell you how to this. I hope you will find it interesting and usefull.
1. Download YouTube Videos.
     a. Go to youtube, search for required video. Just play it there. When it starts playing, copy the URL or             Address from address bar.
     b.Open a new tab in your browser, and open www.keepvid.com
     c. There you will find a text field to paste the address of the required video that you have just copied from youtube. Paste it there  and hit the download button.
    d. After a while you must see the download links of the required video in various formats and qualities. Just click the format or size you need. It will start downloading for you. Isn’t it really simple?
2. Download Facebook Videos.
     a. Browse the required video on facebook. Play it there and copy the URL when it starts playing.
     b.Repeat the above process from b through d.
3. Download DailyMotion Videos.
     a. Browse the required video on dailymotion and click to start playing. Copy the video address from                 address bar.
     b.Open www.savevideo.me in new tab.
     c. Paste the copied URL of required video in the mentioned area. And Hit the Download Button.
     d.After a while you will see the download links of the required video in various formats and qualities. Just         click the format or size you need. It will start downloading for you. Isn’t it too really simple?

From the above steps you might have noticed that the steps are all same but the difference is that when you need to download a video from facebook or youtube you should use www.keepvid.com, and if you have to download a video from dailymotion you need www.savevideo.me. The steps are all pretty simple!

Monday, March 17, 2014

Do you have problem of frequently forgetting your passwords?

Hello guys! Today I am going to share my experiences of dealing with my own passwords. I use to create accounts on many websites for various purposes. You already know that in order to be able to use any online useful data or service you are required to create an account with your email ID, user name for that particular website and a password off course! When you do so for too many websites each for different purpose, one day you may realize that when it comes to check one of you less frequently used account, you have forgot you id or password! It makes us too much frustrate in such situations.
This is what I have suffered from so many times. May be this will be in case of yours too. If it is so then You don’t need to  worry more about this as I have got a solution for you.
The solution is pretty simple; if you are using google chrome, just search for “LastPass” Extension for Chrome. Follow the steps given below to add Last Pass Extension:

In Chrome, go to tools Menu.
Click on Extensions
Scroll down the page and find “Get More Extensions” and click on that. You will find the interface  to search required Extensions.
Write LastPass and search.
 Just click on the “+” in front of LastPass Extesion. It will ask you to download and after a while you     will see it added on your chrome.
Once you have Last Pass installed, you need to create an account on LastPass using your email ID.     
Set a password for that account. After having last pass installed and having account on that. You just need to remember your last pass account and password.
Having your last pass active, whenever you will create an account on any website it will ask to             remember it for you. And you may allow it. Actually it will store all saved accounts information in vault. You can access your vault whenever you need it.

Thursday, March 6, 2014

Facebook rolled out its new feeds design!

Facebook has just rolled out its new feeds design. The new look includes some font changes and more prominent photos that occupies the entire news feed, but the overall look is more subtle than the changes Facebook promised a year ago when it first announced the redesign.

The new design also has some slight changes, for instance bigger buttons added to the "individuals you may know" segment along the right rail and slight appearance tweaks to icons on the "update status" and the "add photos/videos" tabs over the top. The new look won't affect the way stories or ads are surfaced. Pictures for both ads and natural/organic stories will be the same size, as are visible on mobiles 


According to facebook officials this update does not influence advertisement specs, ads execution or improvement.Also these changes will not effect how content is surfaced or the ranking of stories in news feed. 

Monday, March 3, 2014

Uploading Images to be displayed in JQuery Image Slider on Blogger.

Most of the people prefer Image Sliders for their websites or blogs. It really gives your blog or website a nice professionally designed website look. In wordpress it is easy to upload media that may be an image or a video using media library control directly from Wordpress Dashboard. So you can easily embed an image to a post or use it any way you like in wordpress.
On the other hand Blogger, which is a nice blogging platform provided by Google. is being widely used by bloggers around the world. As the advantages of using blogger are very clear; it gives you free space upto 15GB for your blog which is quite enough for bloggers and small or medium entrepreneurs. Blogger also offers free sub domain name like(yourdomain.blogspot.com) for your blog.
You can easily compose, publish and edit your post using the user friendly controls. You can also categorized your posts using "Labels". In short you have the facility to do as you could wish for any blog to make it look like a professionally designed blog / website.
I was just trying to use a custom template with a JQuery Image Slider for my blog. Every thing went smooth except uploading images to be displayed in slider. It took me almost a week to sort the problem but at last I did it. It is a bit tricky. But be relaxed you don not need to worry about it as am going to explain all step by step. just follow me ;
Step No. 1
As you may have already observed there is no any external option to upload media so you need to create new post.
Step No. 2
Upload all required images to that newly created post, I am sure you will do it simply.
Select all the uploaded images and click add selected, and publish the post.
Step No. 3
Return to "All Posts" and preview the post in new window. It will show all images there.
Step No. 4
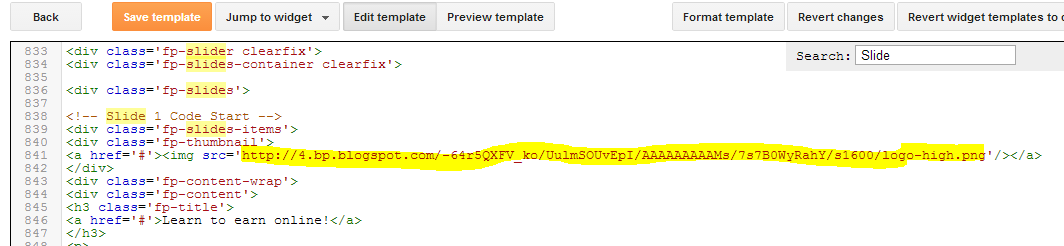
Get the image URL of each individual image (copy url) and paste it where you need. It might be the code section of your image slider; Here am going t change the default image of my template slider:

  • Got to template and Edit HTML
  • Find the image slider code where you need to paste url of newly uploaded image.                          Find image tag  (as shown by highlighted in above image)  and replace the url with your just copied one. 
  • Repeat this process for all images.
  • Click Save Template when you are done.
Step No. 5 
Preview blog. It should display your images :-)
Step No. 6
As you have just created a post with nothing other than images, so the post seems awkward there.  Just delete the post. Don't worry images are still there and you will never loose.